カスタム・コンポーネントのコーディング
Retoolの組み込みコンポーネントで扱われていないユース・ケースがある場合、自分専用のカスタム・コンポーネントを作成して、ユース・ケースを解決します。
カスタム・コンポーネントの作成が不要になる場合もあります
Retoolの組み込みコンポーネントで対応すべき一般的なユース・ケースである場合、カスタム・コンポーネントを作成する前に、機能に関するリクエスト提出を検討してください。リクエストの内容がRetoolの他のユーザーも必要としているものである場合、Retoolチームはリクエストされたコンポーネントを作成します。
前提条件
このガイドでは、以下のことを前提としています。
- 以前にRetoolアプリを作成したことがある。
- React.jsに精通している。カスタム・コンポーネントはReactコンポーネントの場合と、生のHTMLまたはJavaScriptの場合があります。今回の例ではReactコンポーネントを使用します。
概要
このページで行うこと。基本的に、カスタム・コンポーネントはRetoolアプリ内のインラインフレーム(iframe)内に埋め込まれるコードを書く場所を提供しているだけです。これは非常に分かりやすいものになっています。開発者は有効なHTML/CSS/JavaScriptを独自に書くことができ、Retoolはそれを表示します。ただし、iframe内に埋め込むものが何であっても、それがRetoolアプリの他の部分と相互作用することができる場合にのみ、役に立ちます。このガイドでは、カスタマイズしたiframeコードとRetoolアプリの他の部分とを繋ぐために提供しているインターフェイスに着目します。
インターフェイス
Retoolは、カスタム・コンポーネントと相互作用する次の3つの変数triggerQuery、modelおよびmodelUpdateを公開しています。
triggerQueryは、引数が既存のクエリー名である場合にstring型の1つの引数を受け取る関数です。カスタム・コンポーネントからtriggerQueryを実行した場合、Retoolは渡された文字列に一致する名前のクエリーを実行します。modelは、Retoolとカスタム・コンポーネントとの間において共有されている状態を示すオブジェクトです。modelUpdateは、object型の1つの引数を受け取る関数です。modelUpdateに渡された引数は、カスタム・コンポーネントのmodelとマージされます。これは、カスタム・コンポーネント自体がその状態を更新するための方法になります。更新された状態はRetoolアプリの他の部分にも伝えられます。
エディター
カスタム・コンポーネント用のエディターには、Model、IFrame Code、Hide when trueの3つのフィールドがあります。
- Modelでは、カスタム・コンポーネントに渡す
model変数を定義します。 - Ifram Codeとは、カスタム・コンポーネント用のHTML、CSSおよびJavaScriptのことです。
- Hide when trueとは、ブール値を生成するJavaScript式のことです。値が「true」である場合に、コンポーネントが非表示になります。コンポーネントを動的に非表示にする( English )を参照してください。
例
- Custom Componentをキャンバスに追加します。デフォルトのCustom Componentには、Custom Component内からアプリの他の部分とやり取りする方法を示すためのサンプルコードがいくつか含まれています。
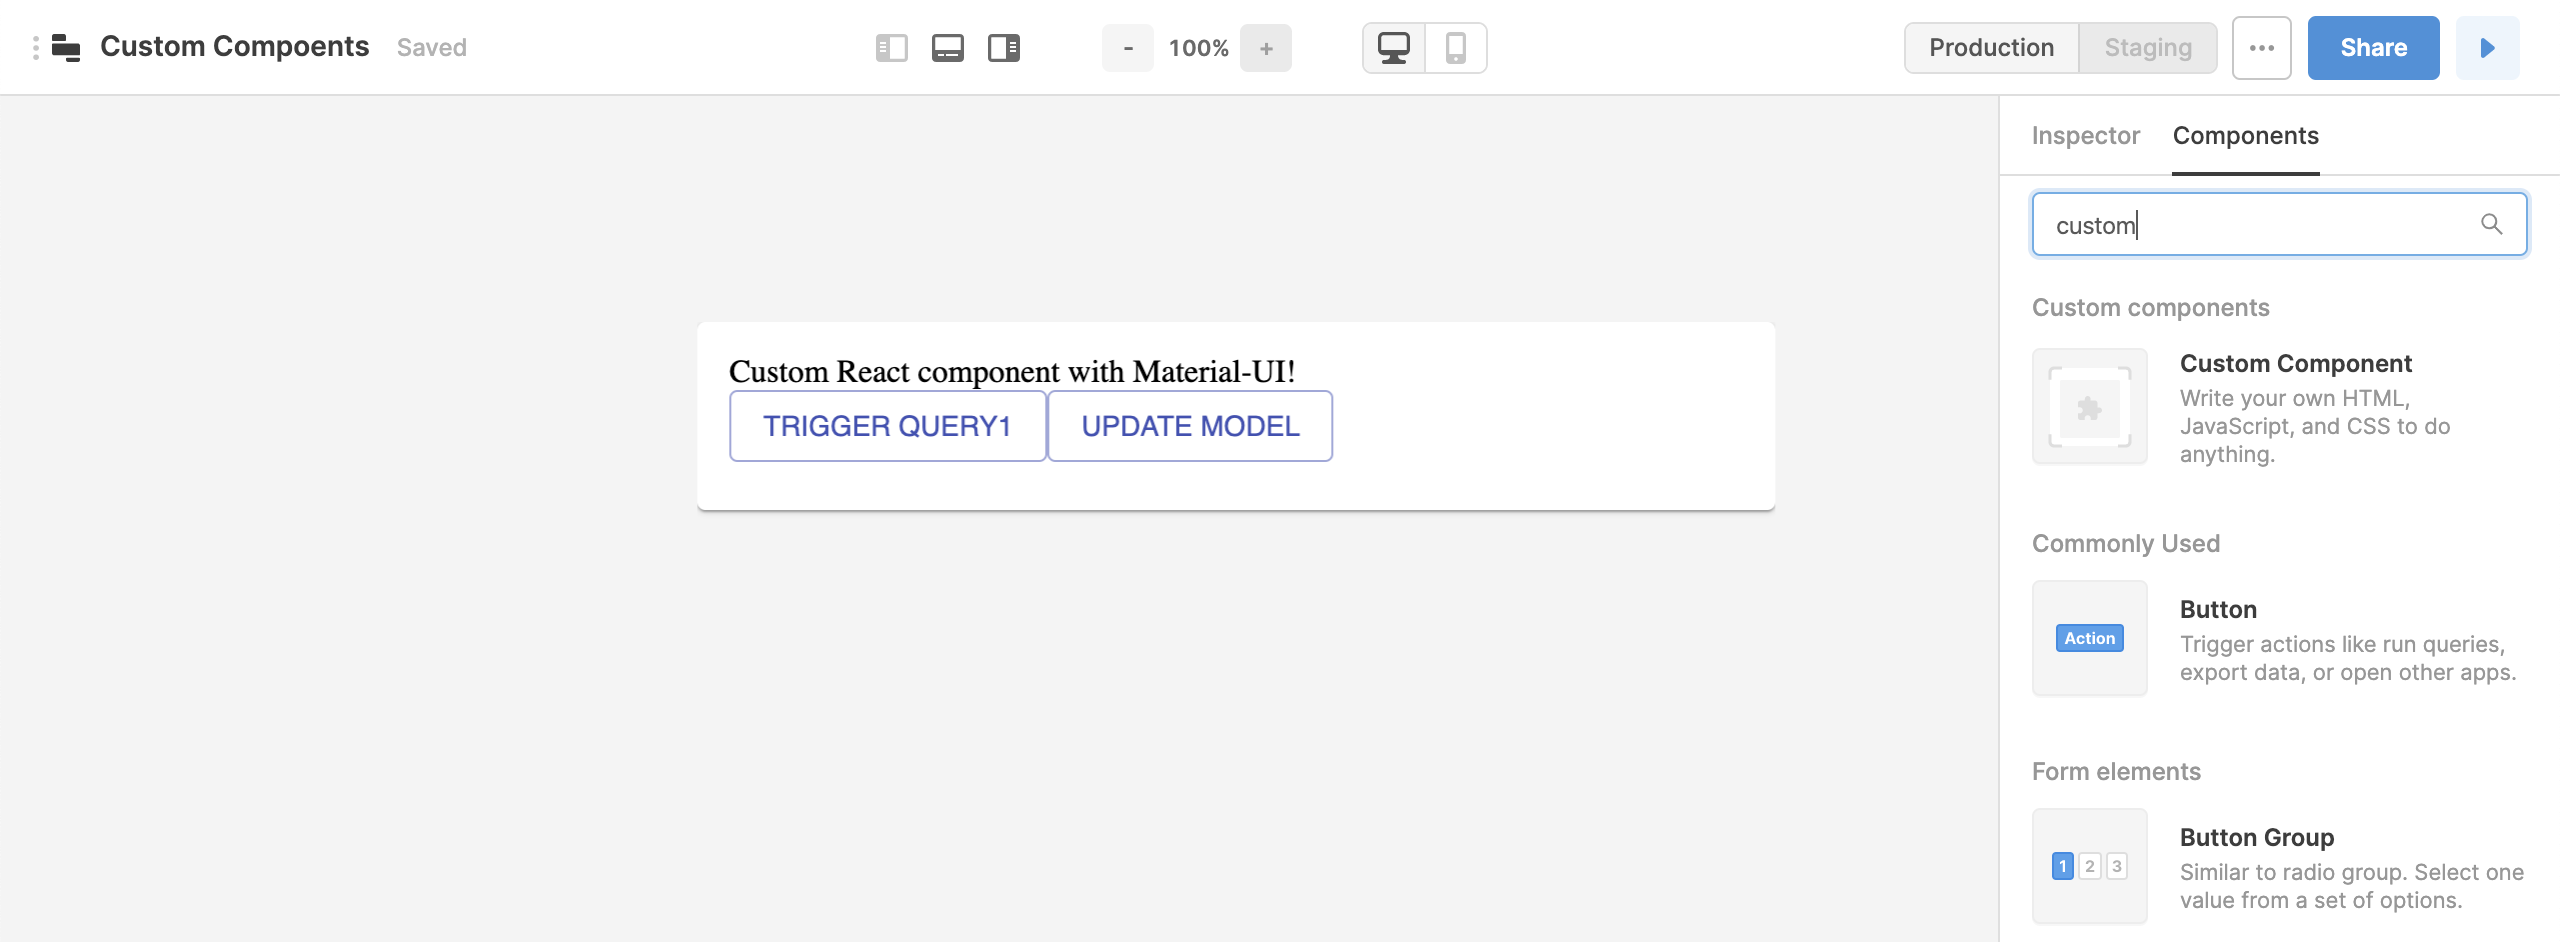
図1. デフォルトのCustom Component
- Custom Componentをクリックすると、カスタム・コンポーネント・エディターが表示されます。
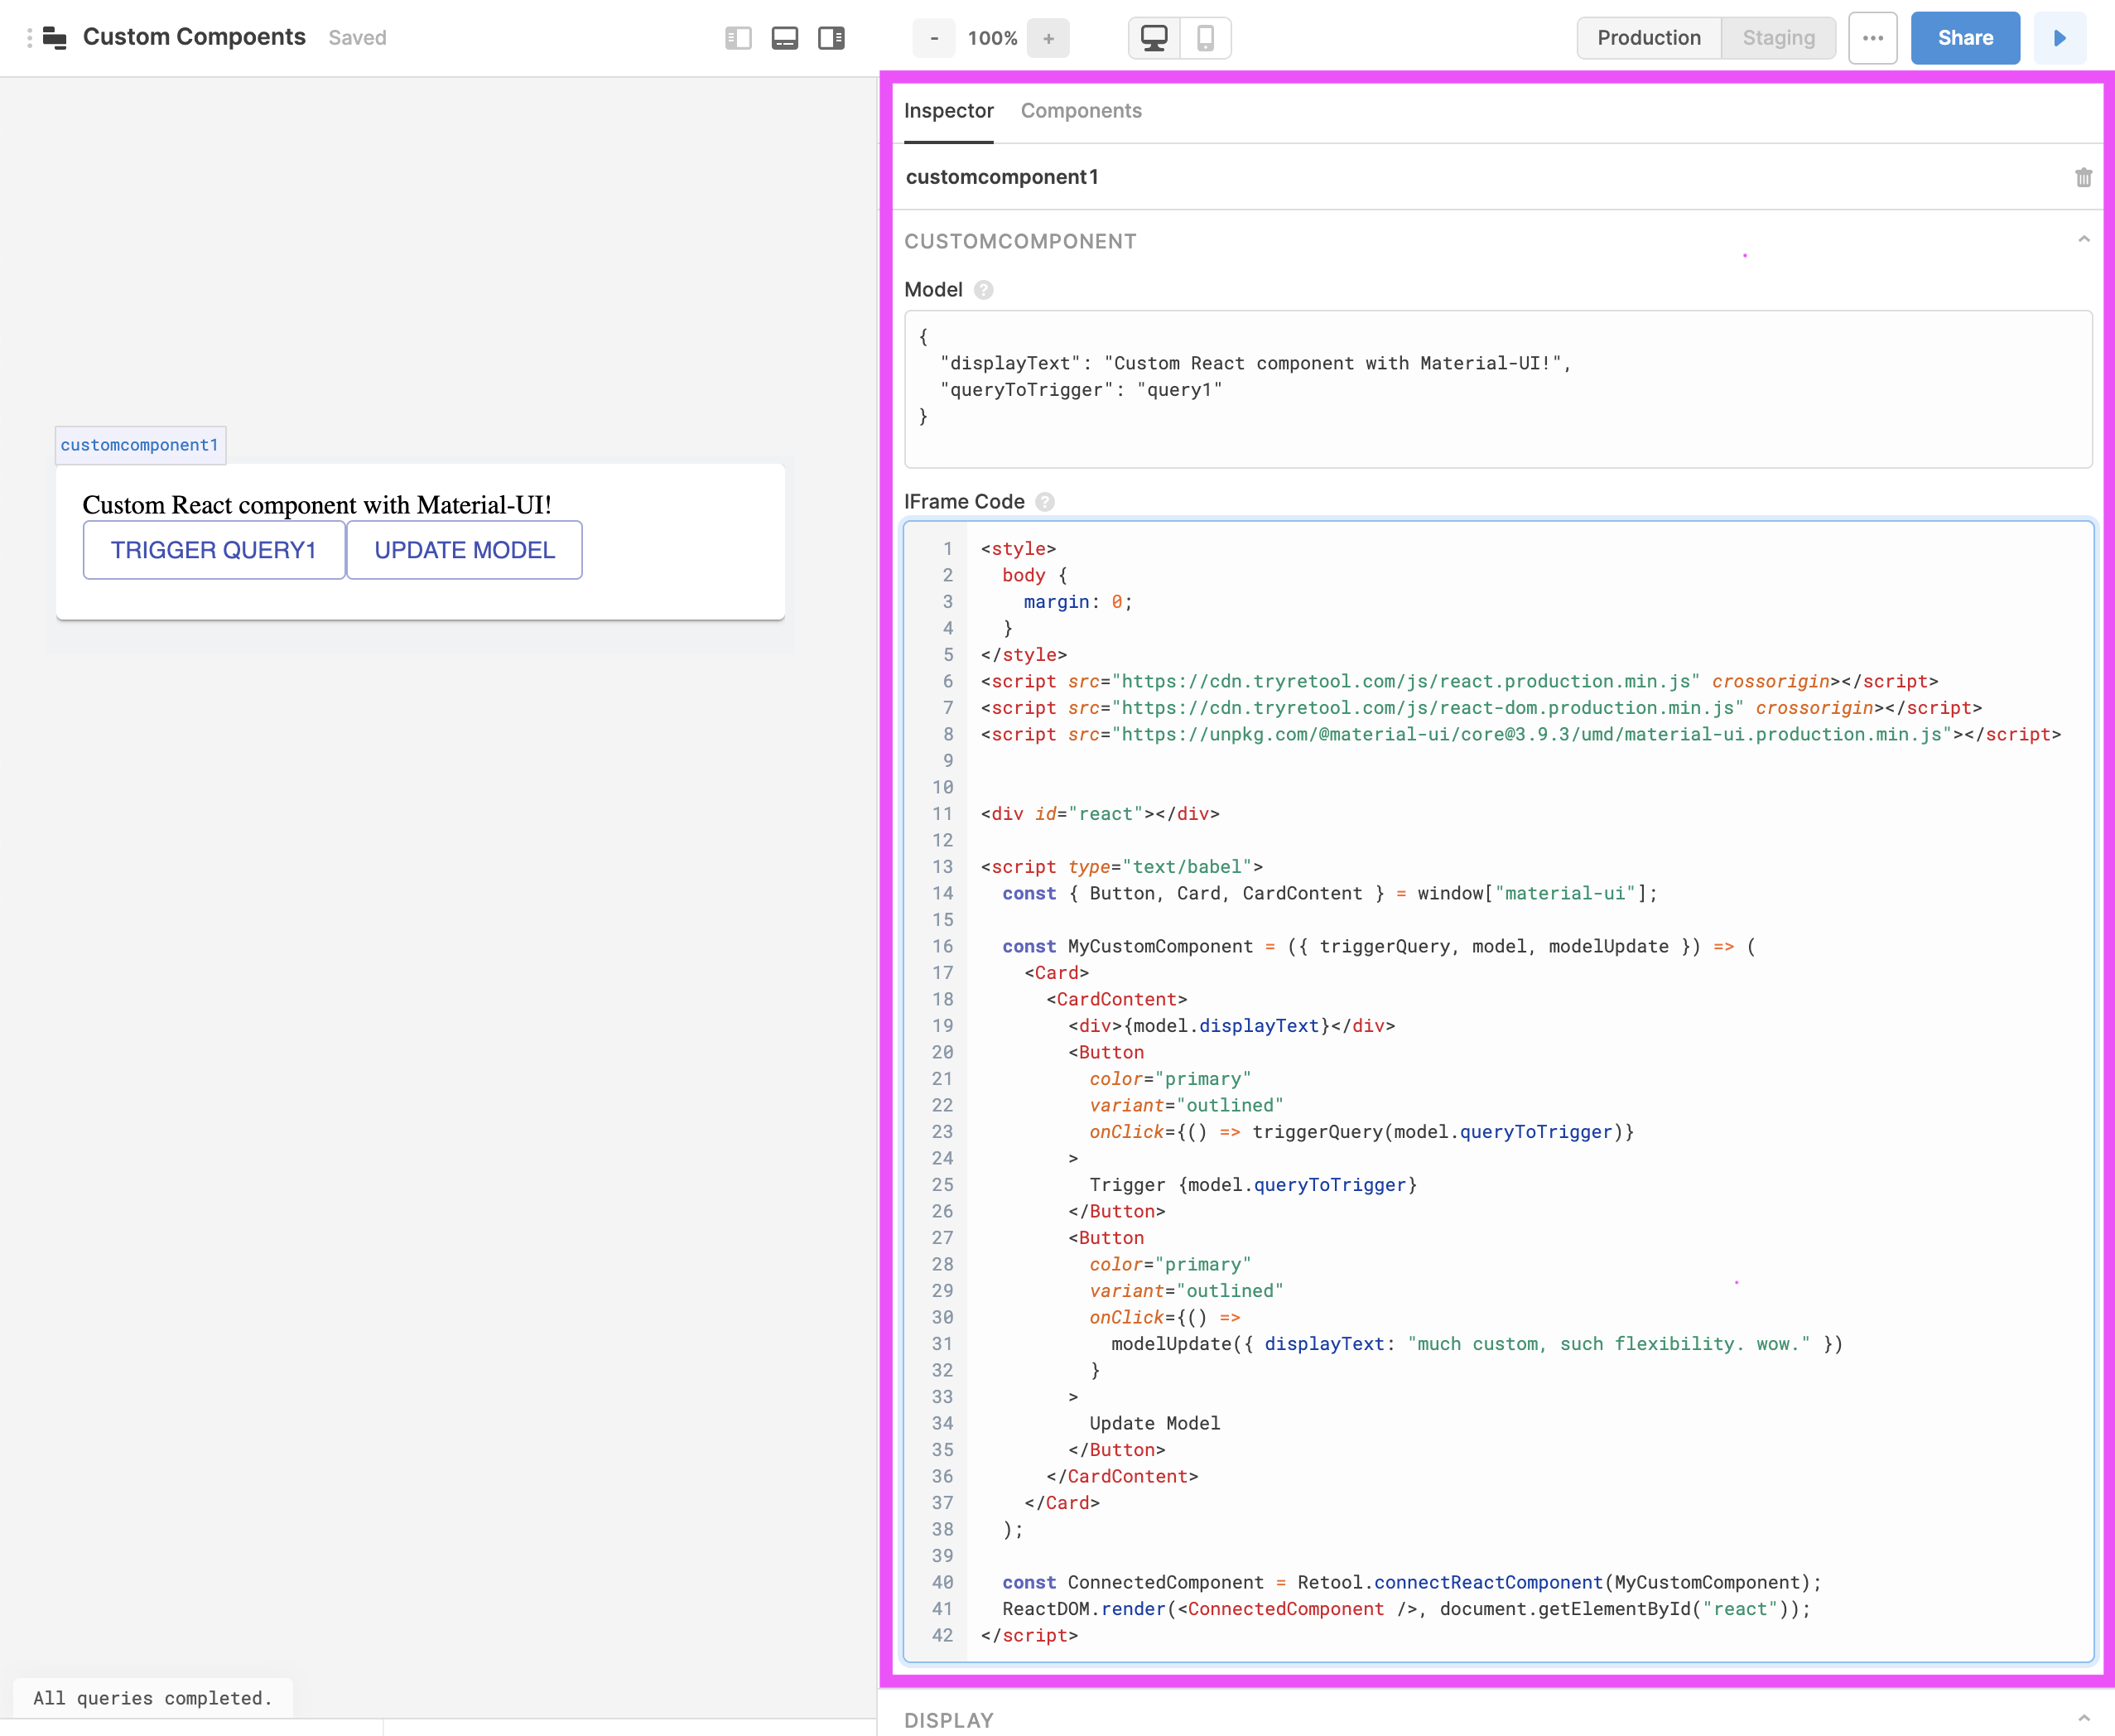
図2. カスタム・コンポーネント・エディター
以降のセクションでは、アプリからカスタム・コンポーネントにデータを渡すといった一般的なタスクにおいてこれらのフィールドを使用する方法を説明します。
カスタム・コンポーネントを実装する
カスタム・コンポーネント・エディターのIframe Codeフィールドには、カスタム・コンポーネント用のHTML、CSSおよびJavaScriptのコードをすべて記述します。フィールド名が示すように、アプリを実行したときに、カスタム・コンポーネントは<iframe>内に埋め込まれます。
以下のboilerplate.htmlでは、動作するカスタム・コンポーネントを作成するために必要な最小限のコードを記述しています。
<script src="https://cdn.tryretool.com/js/react.production.min.js"
        crossorigin></script>
<script src="https://cdn.tryretool.com/js/react-dom.production.min.js"
        crossorigin></script>
<div id="react"></div>
<script type="text/babel">
  const MyCustomComponent = ({ triggerQuery, model, modelUpdate }) => (
    <p>Hello, Retool!</p>
  );
  const ConnectedComponent = Retool.connectReactComponent(MyCustomComponent);
  ReactDOM.render(<ConnectedComponent />, document.getElementById('react'));
</script>
アプリからカスタム・コンポーネントにデータを渡す
カスタム・コンポーネントにText Inputコンポーネントの値を表示させます。具体的には、Text Inputコンポーネントの値がAliceである場合に、カスタム・コンポーネントにHello, Alice!と表示させます。
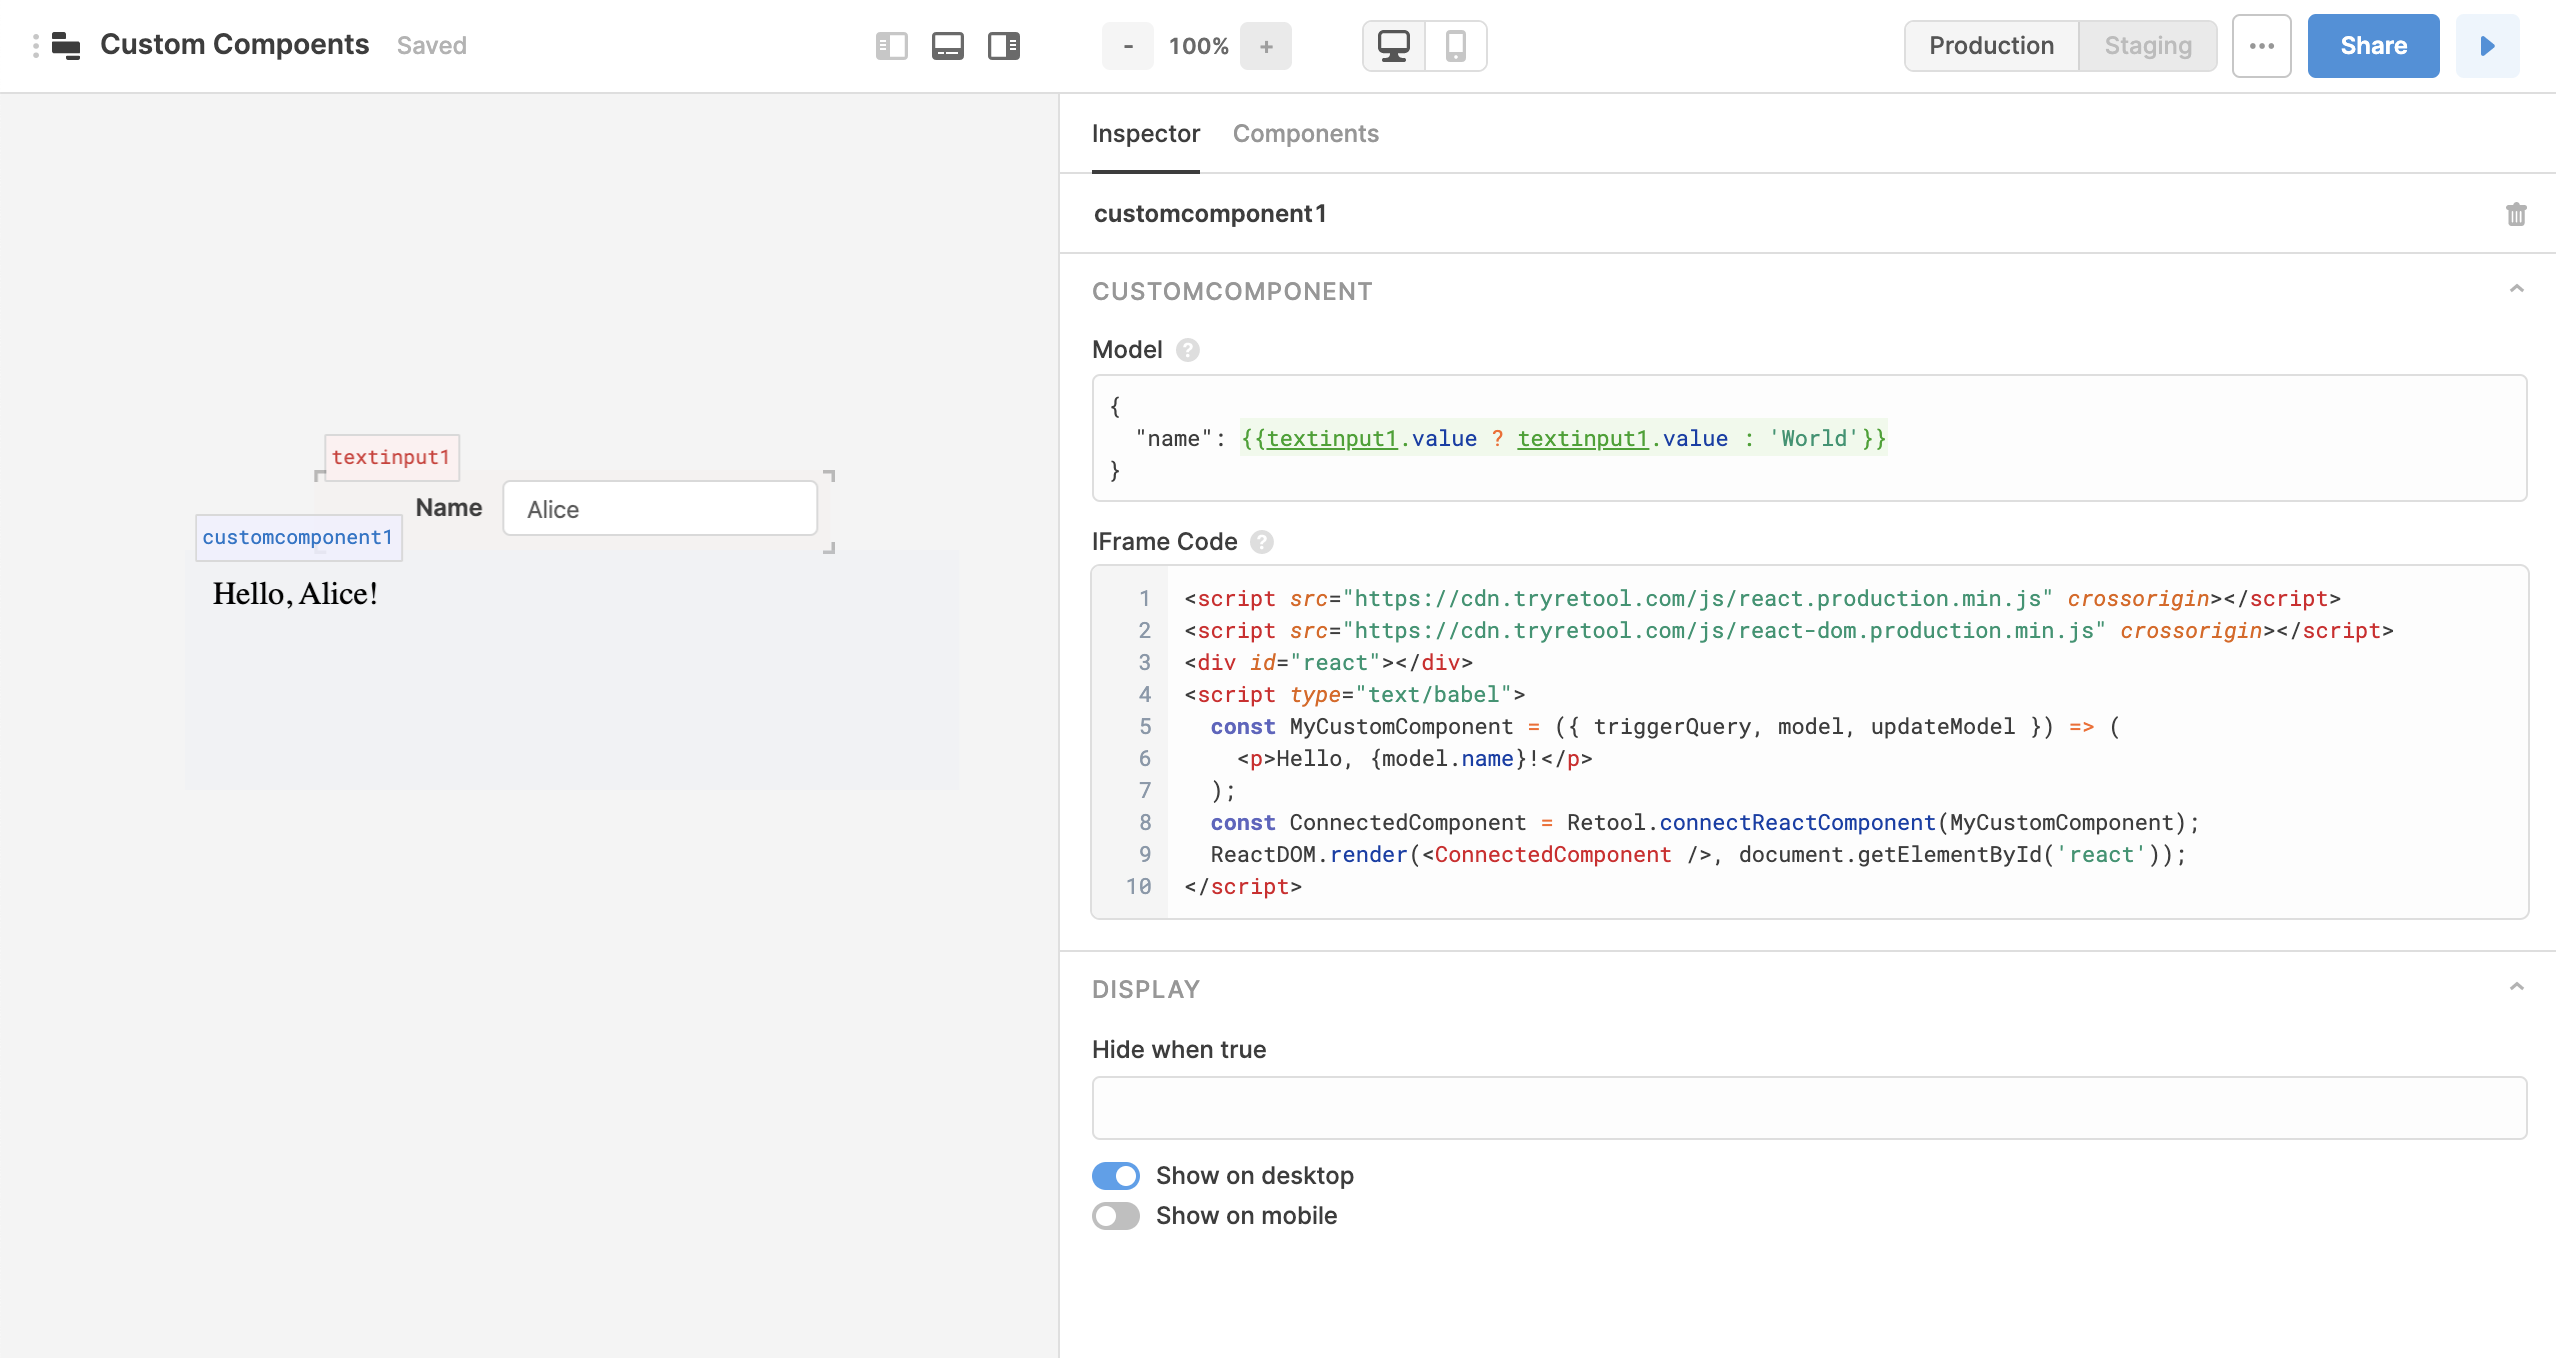
図3. カスタム・コンポーネントにText Inputコンポーネントの値を渡すアプリ
Text Inputコンポーネントからカスタム・コンポーネントにデータを渡すには、以下の操作を行います。
- カスタム・コンポーネント・エディターを開きます。
- Modelフィールドに、以下の
model.jsonコードを記述します。
{
  "name": {{textinput1.value ? textinput1.value : 'World'}}
}上記のmodel.jsonコードが示すように、プロパティの名前や値をハードコードすることができます。また、JavaScriptを使用してこれらを動的に設定することもできます。データを動的に渡す場合は、モデルが更新されるとカスタム・コンポーネントが更新されます。
- Iframe Codeフィールドに、以下の
inflow.htmlコードを記述します。
<script src="https://cdn.tryretool.com/js/react.production.min.js"
        crossorigin></script>
<script src="https://cdn.tryretool.com/js/react-dom.production.min.js"
        crossorigin></script>
<div id="react"></div>
<script type="text/babel">
  const MyCustomComponent = ({ triggerQuery, model, modelUpdate }) => (
    <p>Hello, { model.name }!</p>
  );
  const ConnectedComponent = Retool.connectReactComponent(MyCustomComponent);
  ReactDOM.render(<ConnectedComponent />, document.getElementById('react'));
</script>
カスタム・コンポーネントからアプリにデータを渡す
Textコンポーネントに、カスタム・コンポーネント内の入力欄に入力された値を表示させます。具体的には、カスタム・コンポーネントでユーザーがValentineと入力したときに、TextコンポーネントにHello, Valentine!と表示させます。
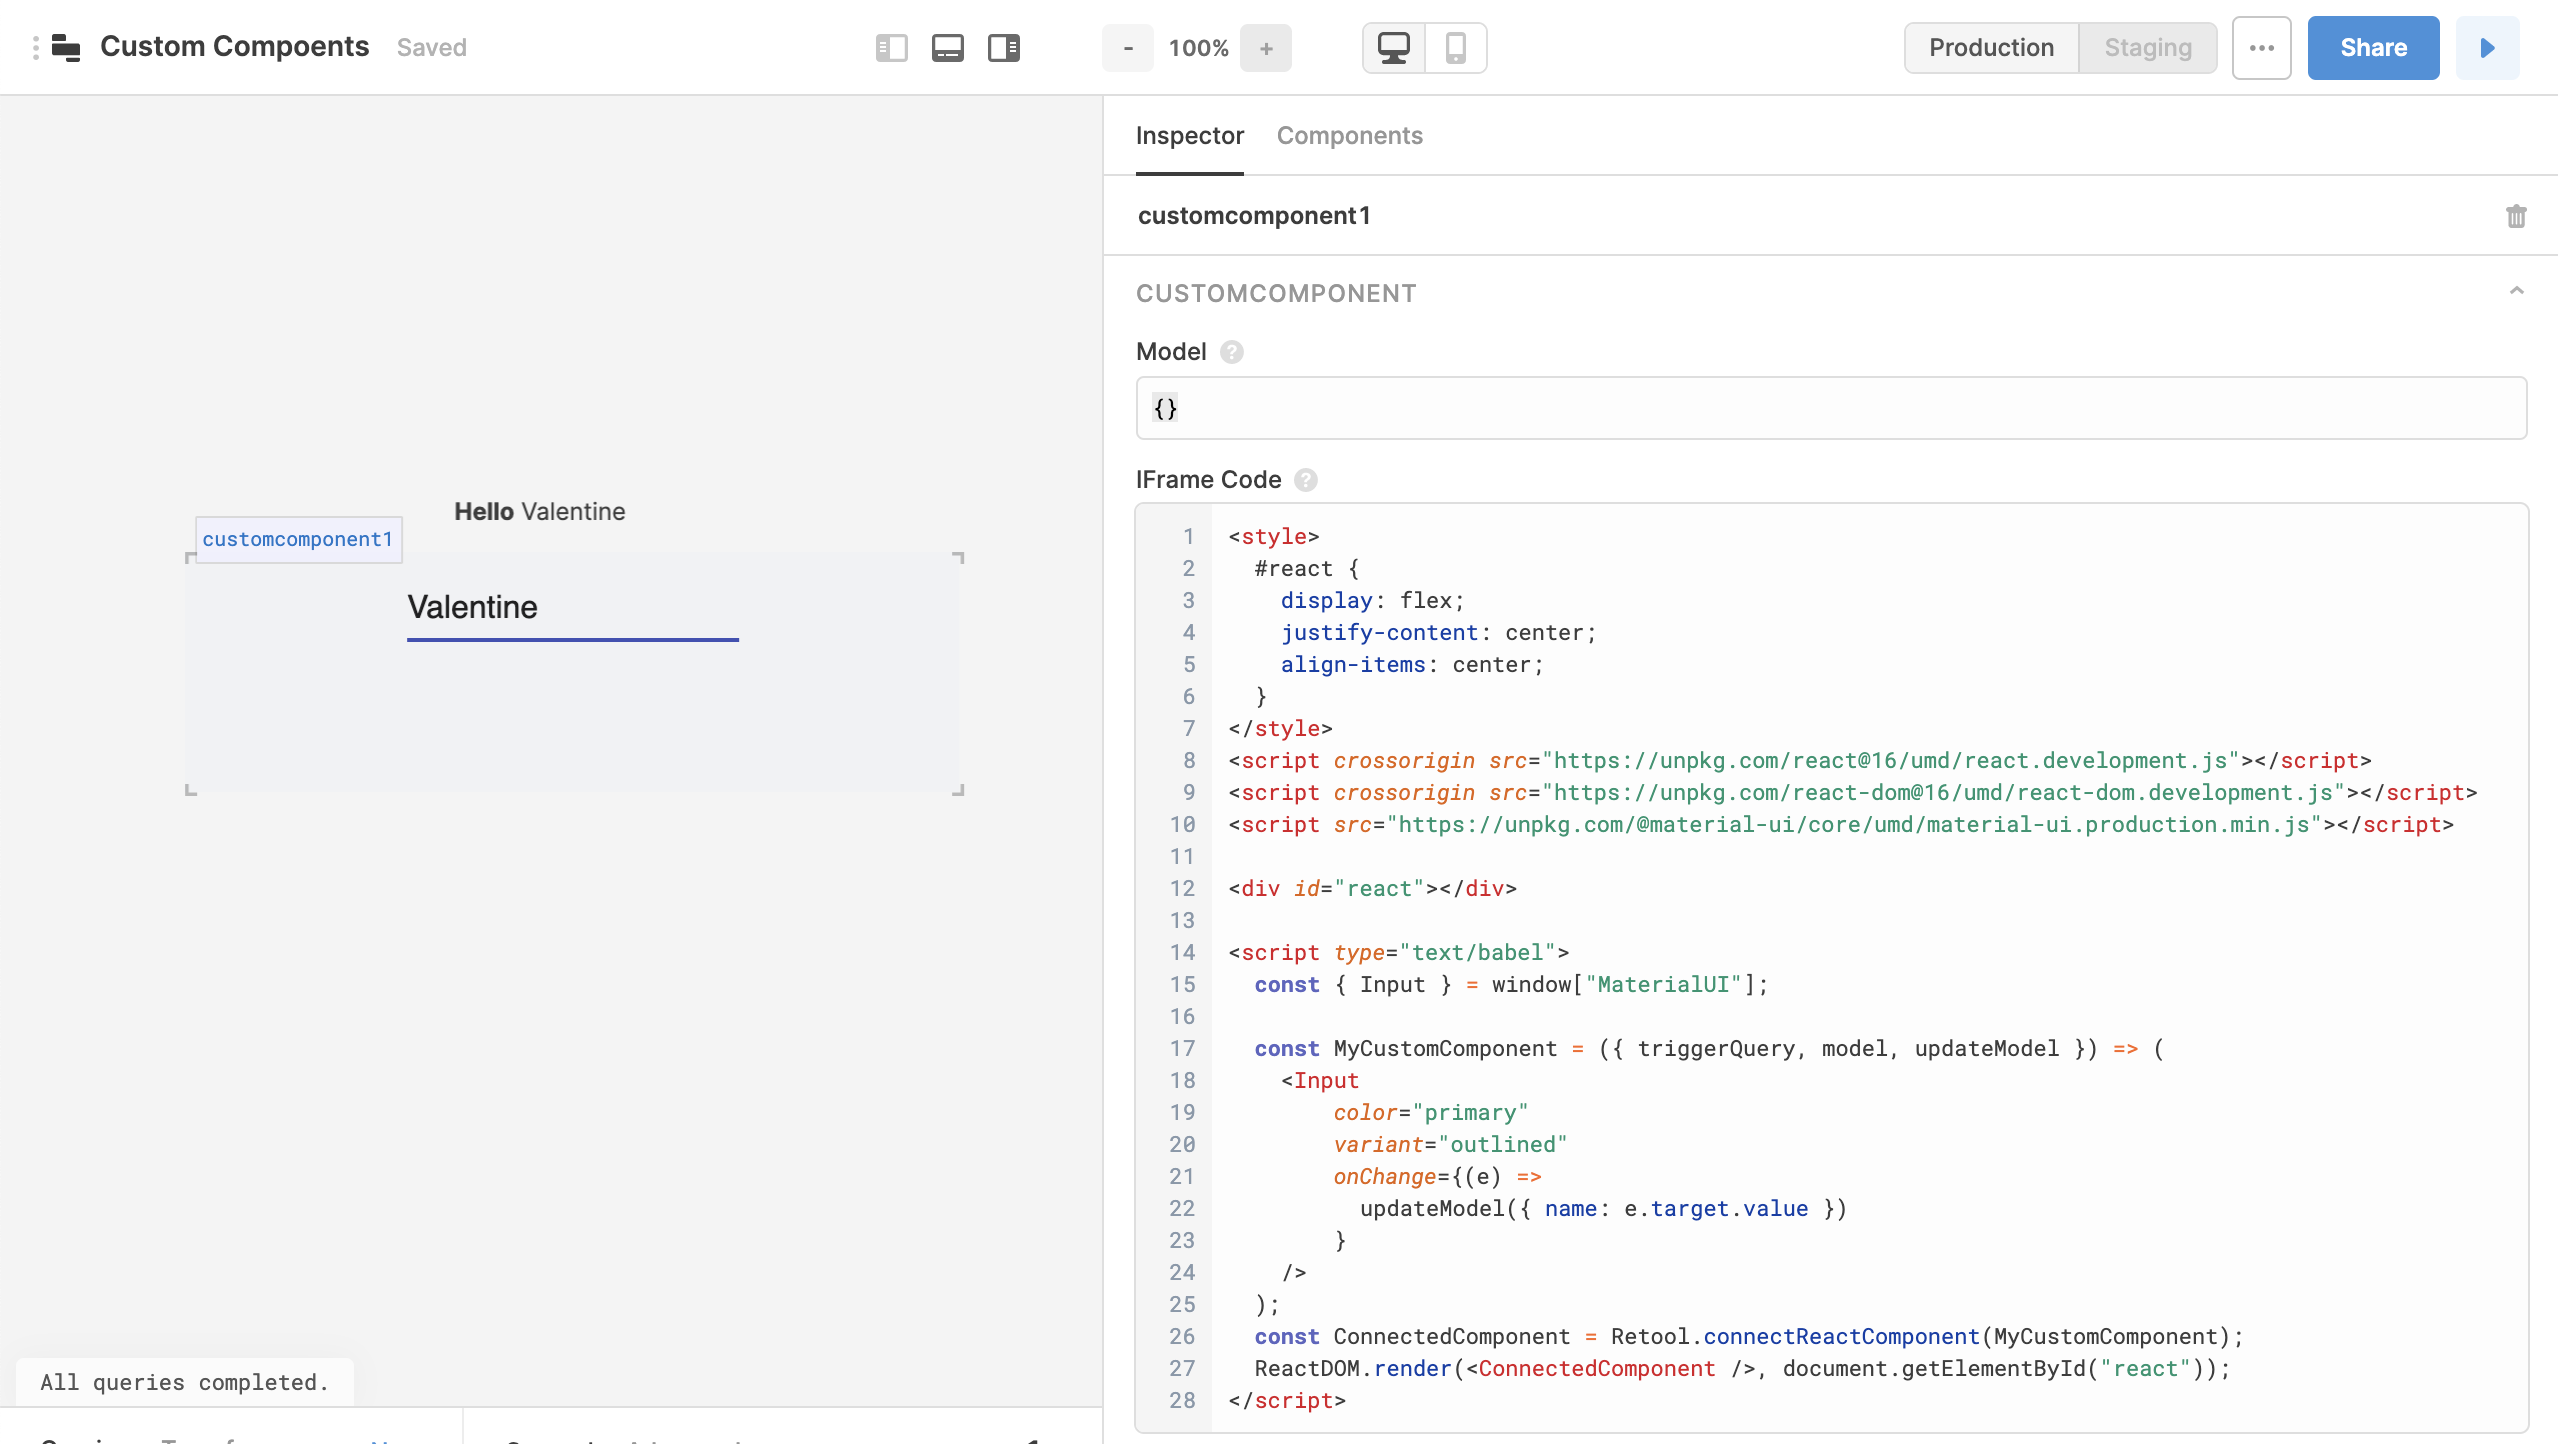
図4. カスタム・コンポーネントからTextコンポーネントにデータを渡すアプリ
カスタム・コンポーネントからアプリの他の部分にデータを渡すには、以下の操作を行います。
- Iframe Codeフィールドに、以下の
outflow.htmlコードを記述します。カスタム・コンポーネントが作成されるときに渡される3番目の引数modelUpdateは、カスタム・コンポーネントからアプリの他の部分にデータを渡す際に重要な役割を果たします。modelUpdateはobject型の1つの引数を取ります。この引数は、カスタム・コンポーネントのモデルに対して行われる更新を表します。modelUpdate()をsetState()のように捉えてみましょう。
<style>
  body {
    border: 5px solid red;
  }
  #react {
    display: flex;
    justify-content: center;
    align-items: center;
  }
</style>
<script src="https://cdn.tryretool.com/js/react.production.min.js" crossorigin></script>
<script src="https://cdn.tryretool.com/js/react-dom.production.min.js" crossorigin></script>
<script src="https://unpkg.com/@material-ui/core@3.9.3/umd/material-ui.production.min.js"></script>
<div id="react"></div>
<script type="text/babel">
  const { Input } = window["material-ui"];
  const MyCustomComponent = ({ triggerQuery, model, modelUpdate }) => (
    <Input
        color="primary"
        variant="outlined"
        value={model.textInputValue}
        onChange={(e) =>
          modelUpdate({ name: e.target.value })
        }
    />
  );
  const ConnectedComponent = Retool.connectReactComponent(MyCustomComponent);
  ReactDOM.render(<ConnectedComponent />, document.getElementById("react"));
</script>- Textコンポーネントの値を
Hello, {{ customcomponent1.model.name }}!に設定します。
カスタム・コンポーネントからクエリーをトリガーする
カスタム・コンポーネント内でユーザーが入力したテキスト入力に基づいてクエリーをトリガーします。例えば、デフォルトでは、在庫のあるすべての本がテーブルに表示されます。
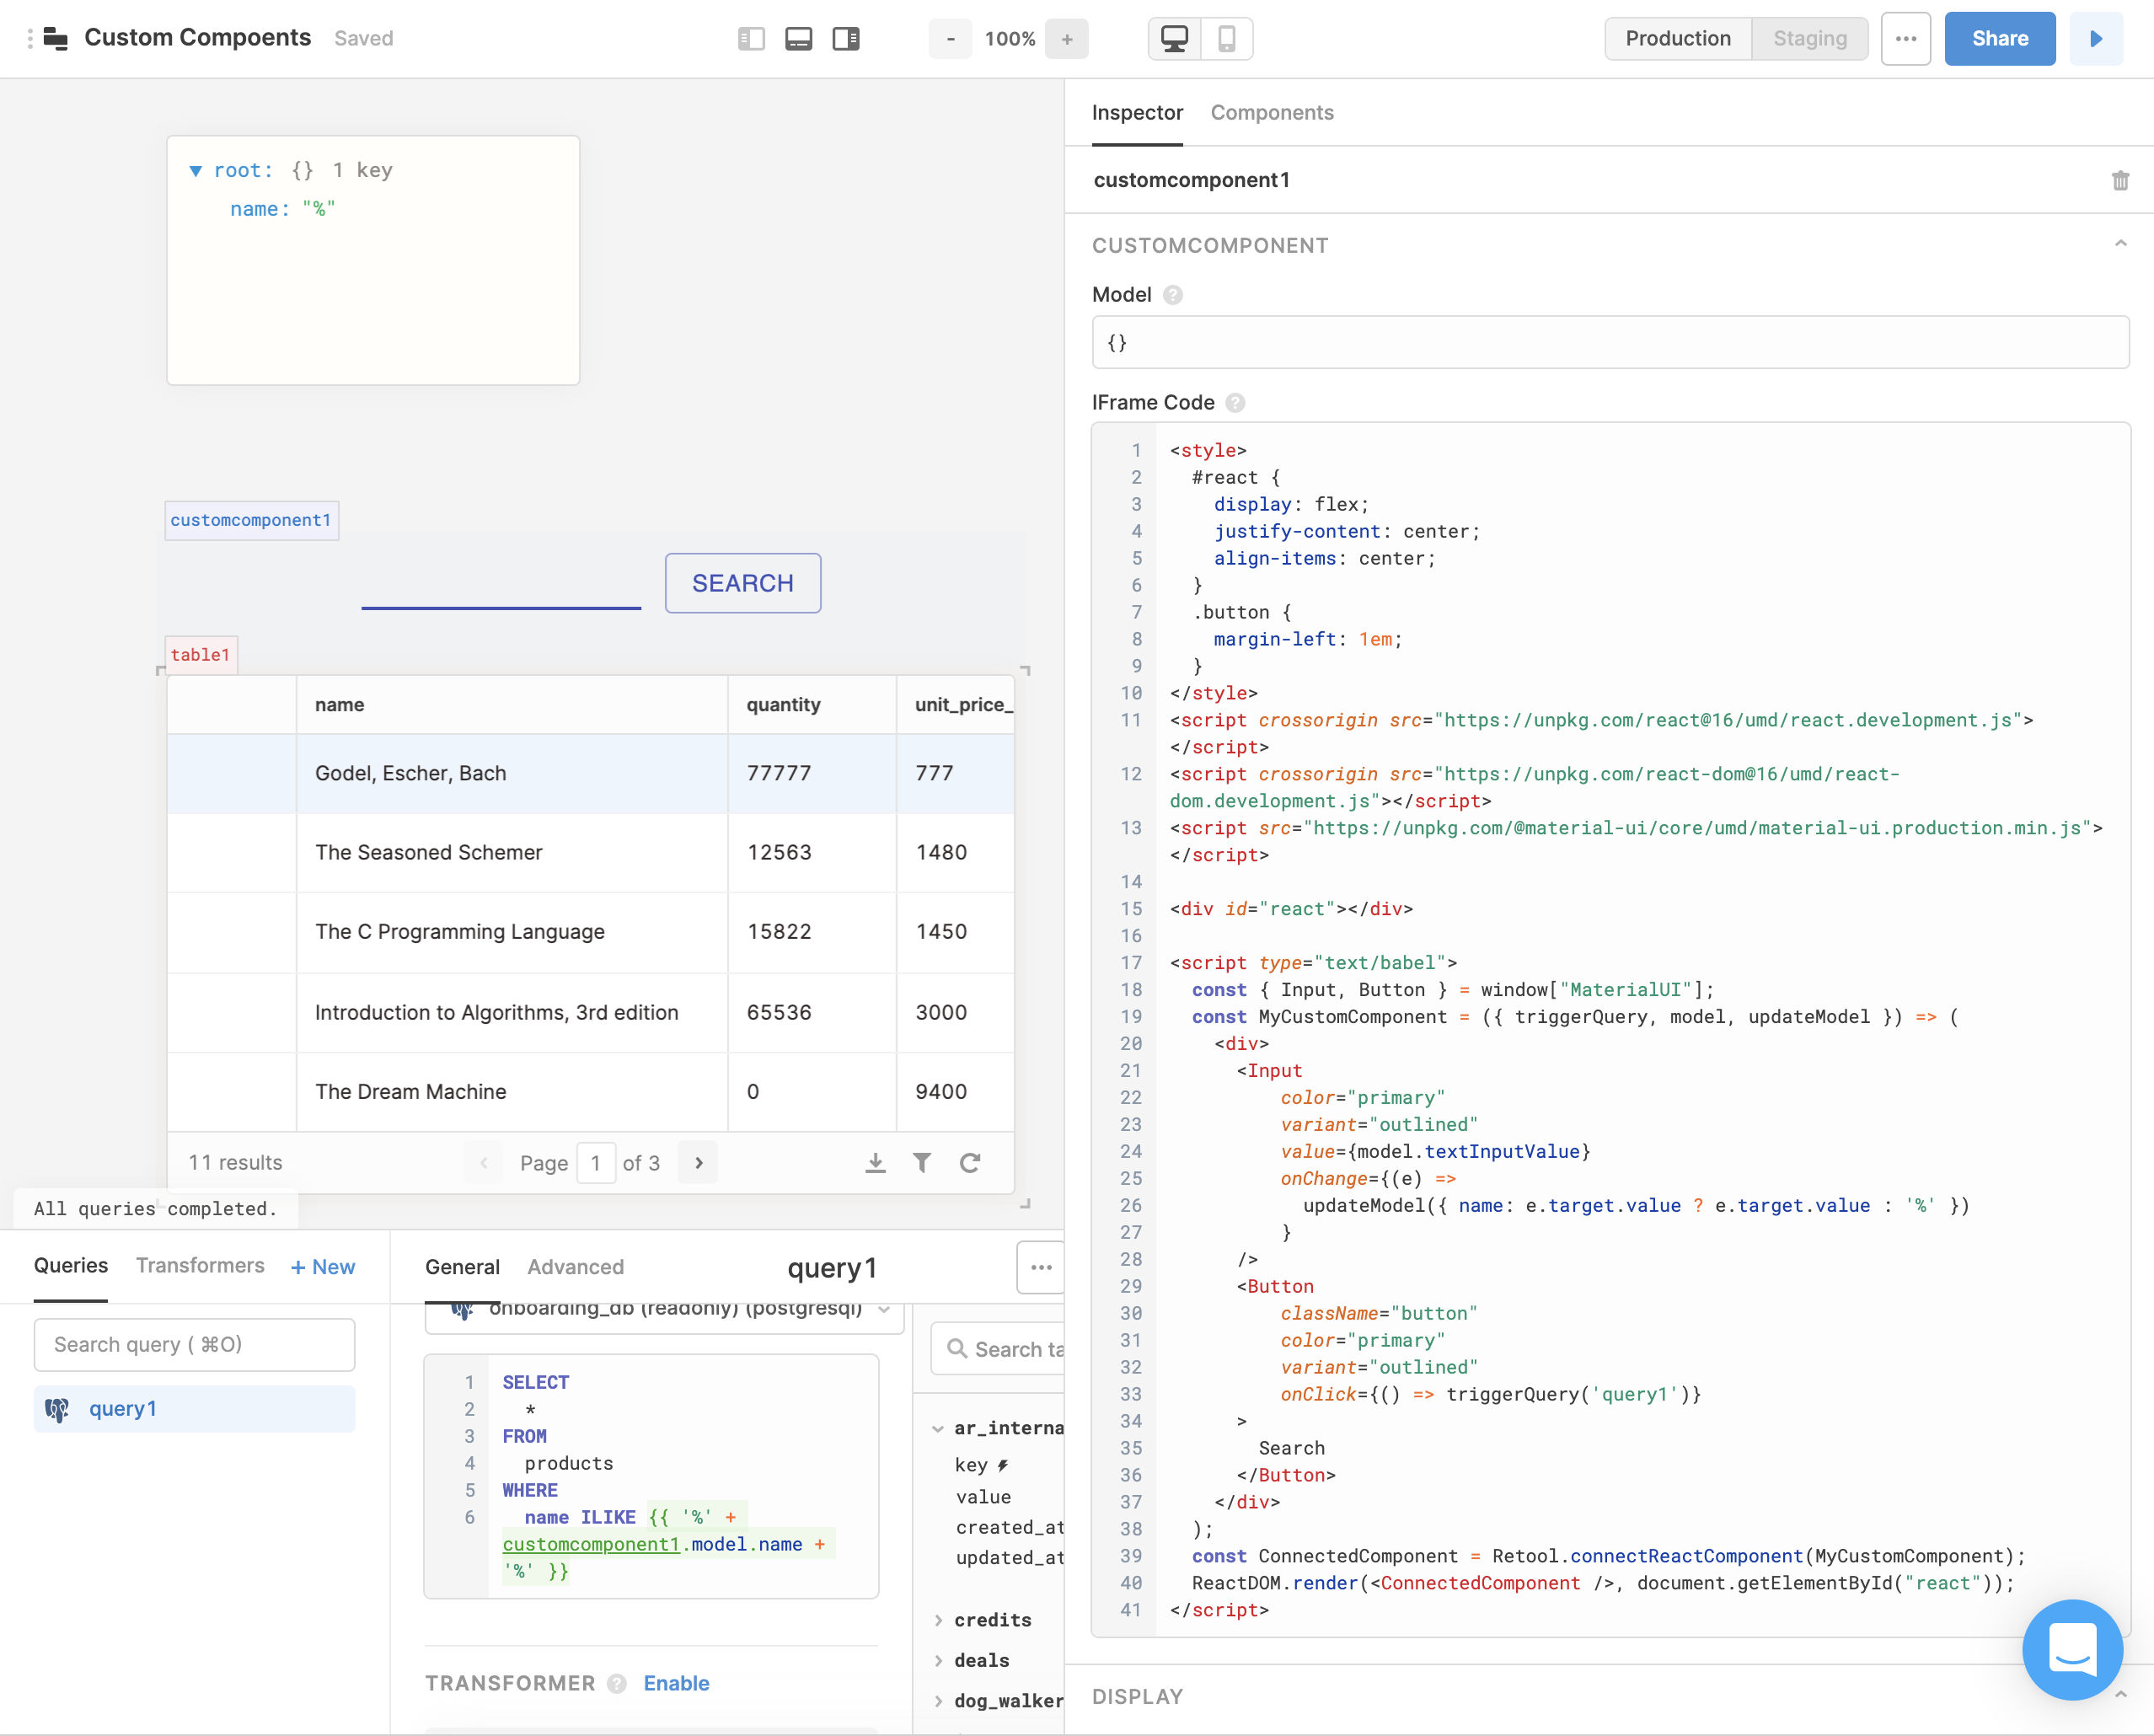
図5. デフォルトのビュー
カスタム・コンポーネント内の入力欄にユーザーが何かを入力して、Searchを押すと、ユーザーの入力内容に一致するタイトルの本のみがテーブルに表示されます。
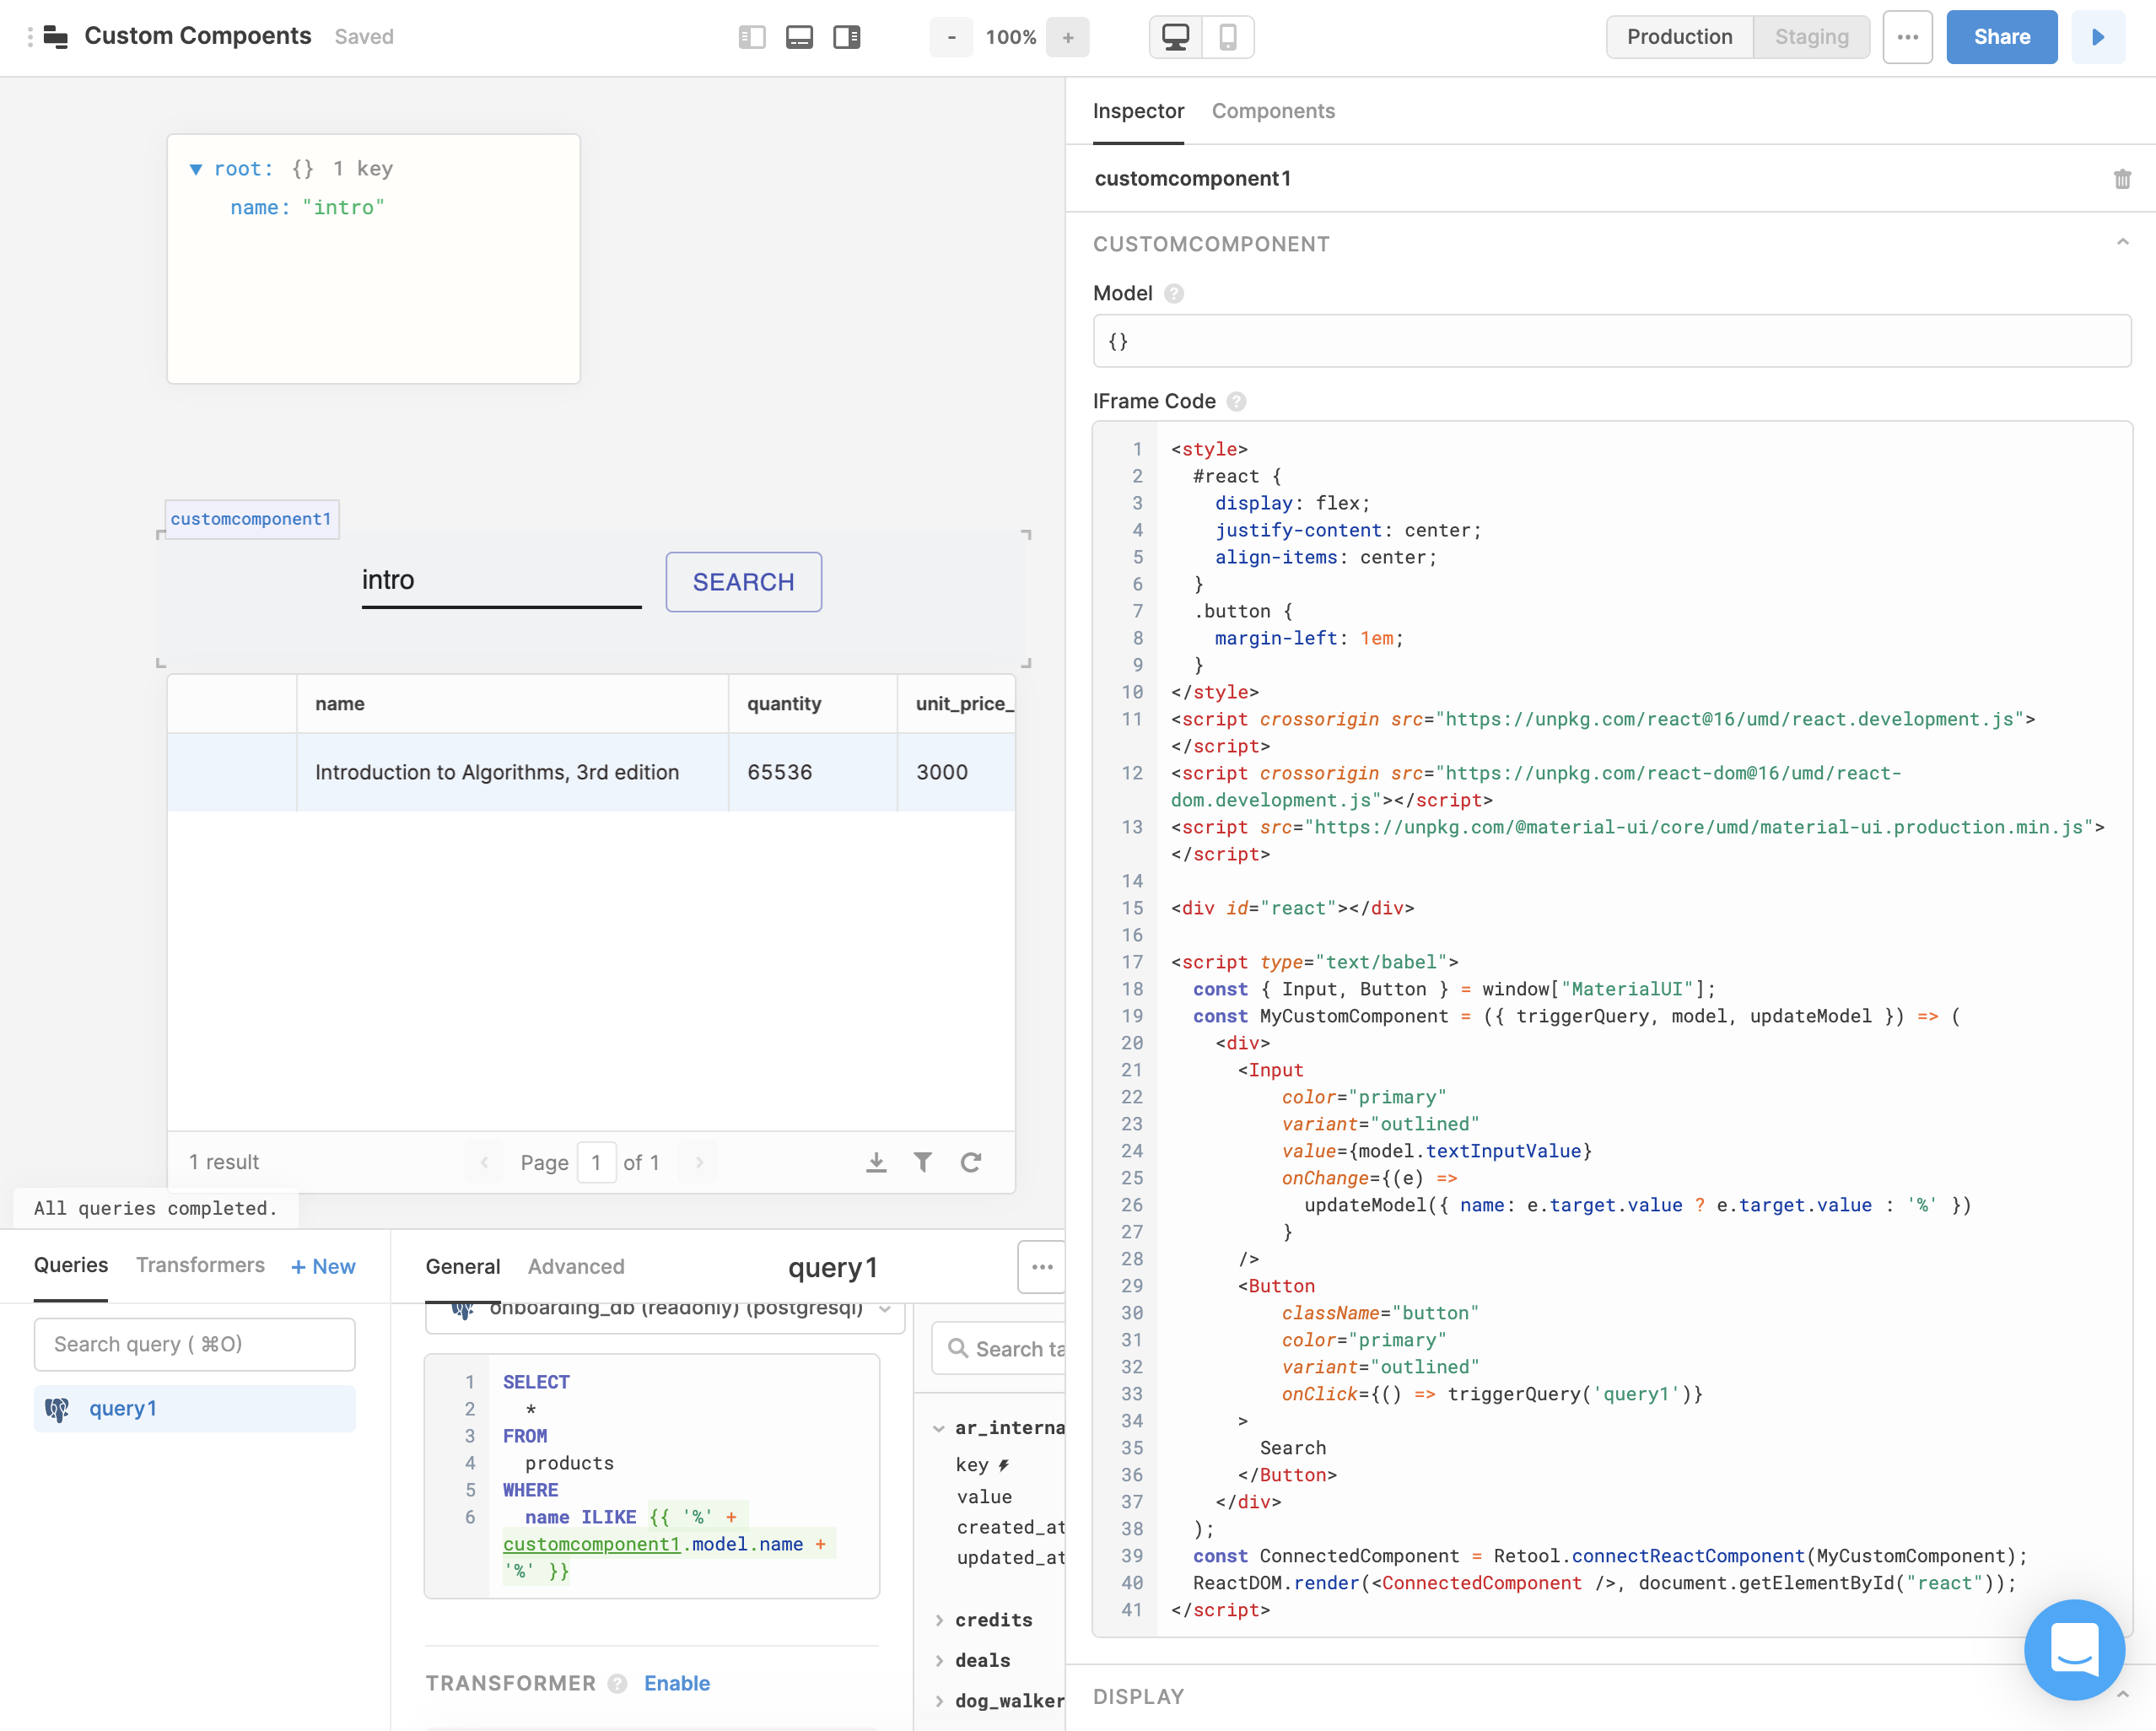
図6. ユーザーの検索内容に基づいて更新されたビュー
カスタム・コンポーネントからクエリーをトリガーするには、以下の操作を行います。
- クエリーに必要なモデル・データを設定します。
triggerquery.htmlには、図5と図6のアプリに使用されたIframe Codeの完全なコードが含まれています。このサンプル・アプリでは、Inputの値が変更されると、Inputコンポーネントがカスタム・コンポーネントのモデルを更新します。
<style>
  body {
    border: 5px solid red;
  }
  #react {
    display: flex;
    justify-content: center;
    align-items: center;
    height: 100%;
  }
  .button {
    margin-left: 1em;
  }
</style>
<script src="https://cdn.tryretool.com/js/react.production.min.js" crossorigin></script>
<script src="https://cdn.tryretool.com/js/react-dom.production.min.js" crossorigin></script>
<script src="https://unpkg.com/@material-ui/core@3.9.3/umd/material-ui.production.min.js"></script>
<div id="react"></div>
<script type="text/babel">
  const { Input, Button } = window["material-ui"];
  const MyCustomComponent = ({ triggerQuery, model, modelUpdate }) => (
    <div>
      <Input
          color="primary"
          variant="outlined"
          value={model.textInputValue}
          onChange={(e) =>
            modelUpdate({ name: e.target.value ? e.target.value : '%' })
          }
      />
      <Button
          className="button"
          color="primary"
          variant="outlined"
          onClick={() => triggerQuery('query1')}
      >
        Search
      </Button>
    </div>
  );
  const ConnectedComponent = Retool.connectReactComponent(MyCustomComponent);
  ReactDOM.render(<ConnectedComponent />, document.getElementById("react"));
</script>-
triggerQuery関数を使用して、カスタム・コンポーネント内からクエリーをトリガーします。triggerquery.htmlでは、ユーザーがSearchボタンをクリックしたときに、クエリーがトリガーされます。ButtonコンポーネントのonClickイベント・リスナーがこの処理を行います。 -
クエリーを変更し、カスタム・コンポーネントのモデルのデータにアクセスできるようにします。
query1.sqlには、図5と図6のアプリに使用された文が記述されています。
SELECT
  *
FROM
  products
WHERE
name ILIKE {{ '%' + customcomponent1.model.name + '%' }}図5と図6のアプリでは、以下のmodel.jsonに示すように、カスタム・コンポーネントのモデルのnameプロパティがデフォルトで%に設定されていることに注意してください。また、triggerquery.htmlのmodelUpdate({ name: e.target.value ? e.target.value : '%' })コールにも注意してください。アプリがデフォルトですべての在庫を表示することができるように、nameプロパティの代替値として%が記述されています。
{
  name: "%"
}
その他の例
カスタムPlotlyグラフ
Plotlyでグラフを作成する場合に、カスタム・コンポーネントをコーディングする必要がなくなります。
Retoolに、Plotly Chartコンポーネントが新たに加わりました。詳細については、plotly.jsでデータをグラフ化するを参照してください。
以下に、RetoolアプリからPlotlyグラフにデータを渡す方法を示します。
Plotlyグラフ用のモデルを設定します。
{
  "plotData": { x: [1,2,3], y: [1,2,3]}
}
Iframe Codeフィールドに、Plotlyグラフを作成するための以下のコードを記述します。
<style>
  body {
    margin: 0;
  }
</style>
<script src="https://cdn.tryretool.com/js/react.production.min.js" crossorigin></script>
<script src="https://cdn.tryretool.com/js/react-dom.production.min.js" crossorigin></script>

<script src="	https://cdn.plot.ly/plotly-latest.min.js"></script>
<script src="https://unpkg.com/react-plotly.js@latest/dist/create-plotly-component.js"></script>
<script src="https://unpkg.com/babel-standalone@6/babel.min.js"></script>
<script src="https://unpkg.com/@material-ui/core/umd/material-ui.production.min.js"></script>
<script src="https://cdnjs.cloudflare.com/ajax/libs/underscore.js/1.9.1/underscore-min.js"></script>

<div id="react" />
<script type="text/babel">
	const Plot = createPlotlyComponent.default(Plotly);
  console.log(Plot);


  const MyCustomComponent = ({ triggerQuery, model, modelUpdate }) => (
      <Plot
        data={[
          {
            x: model.plotData.x,
            y: model.plotData.y,
            type: 'bar',
            marker: {color: 'purple'},
          }
        ]}
        onClick={(v) => {
					modelUpdate({ selectedPoints: v.points.map(p => ({ x: p.x, y: p.y })) })
        }}
        layout={ {title: 'Scatter Plot'} }
        style={ {width: "100%", height: "100vh"} }
      />
  );

  const ConnectedComponent = Retool.connectReactComponent(MyCustomComponent);
  ReactDOM.render(<ConnectedComponent />, document.getElementById("react"));
</script>
これで、できあがりです。
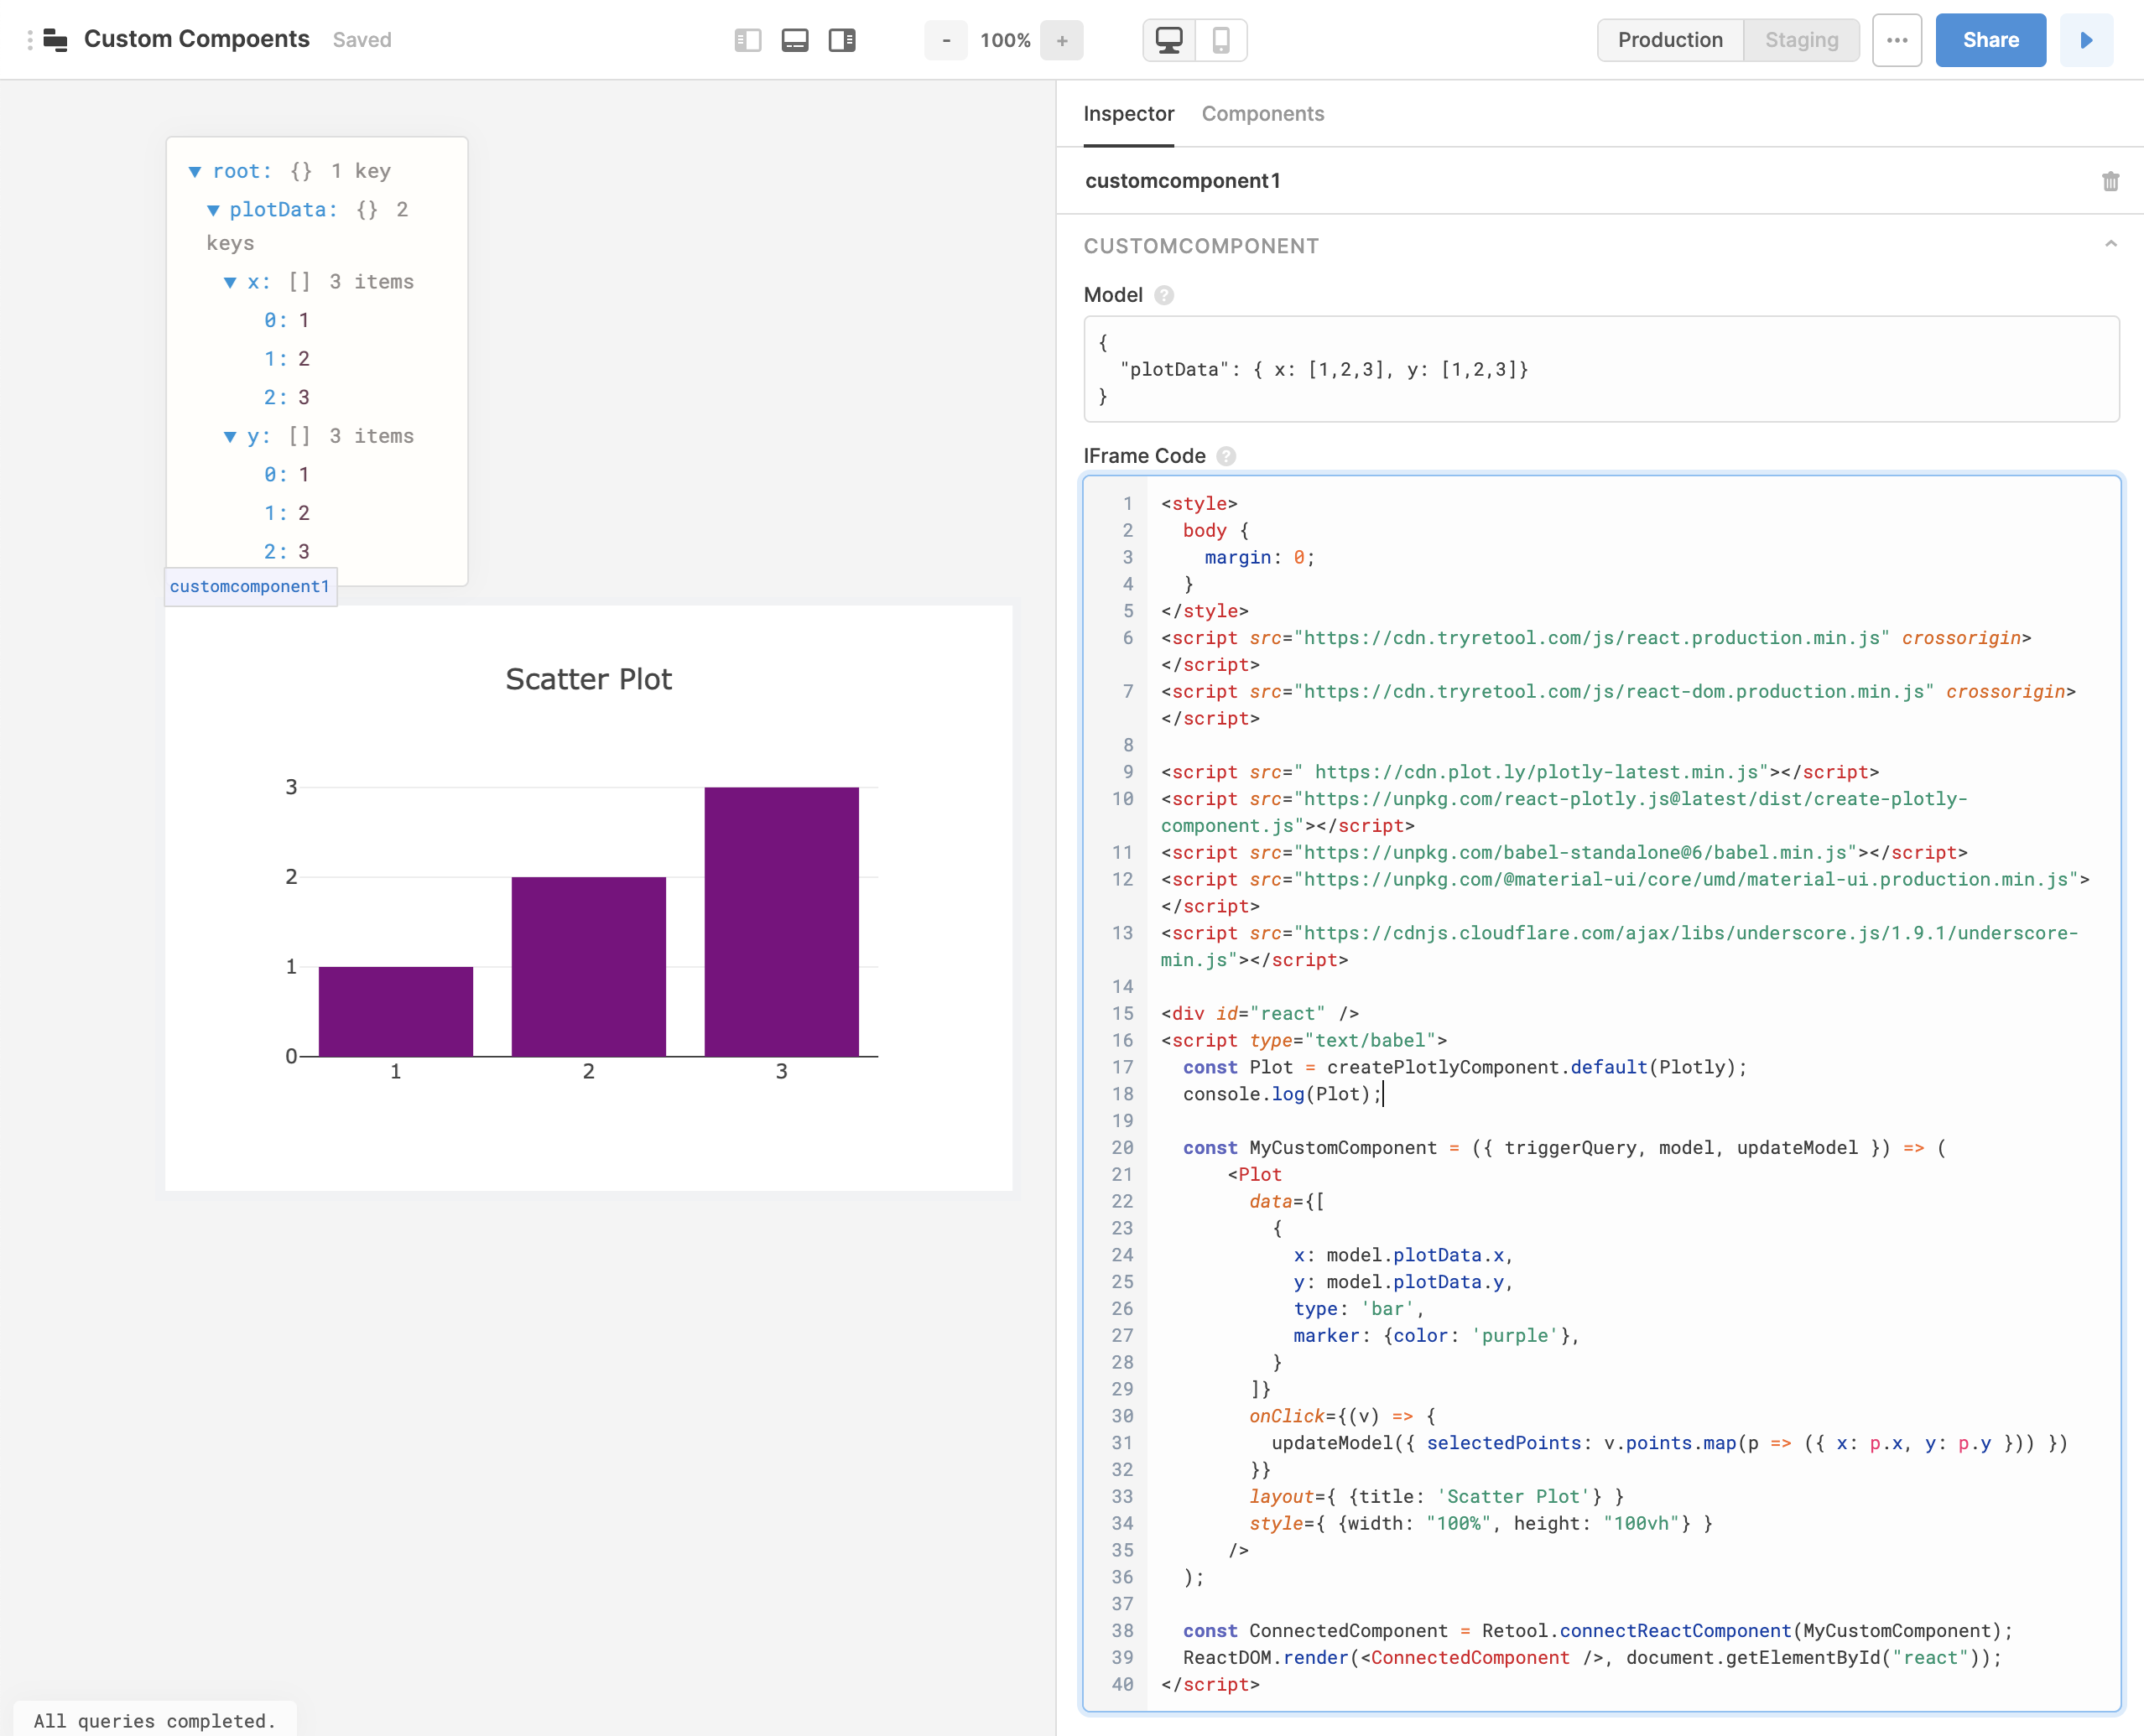
図7. Plotlyグラフを例にしたカスタム・コンポーネント
カスタム・ボタン/コントロール
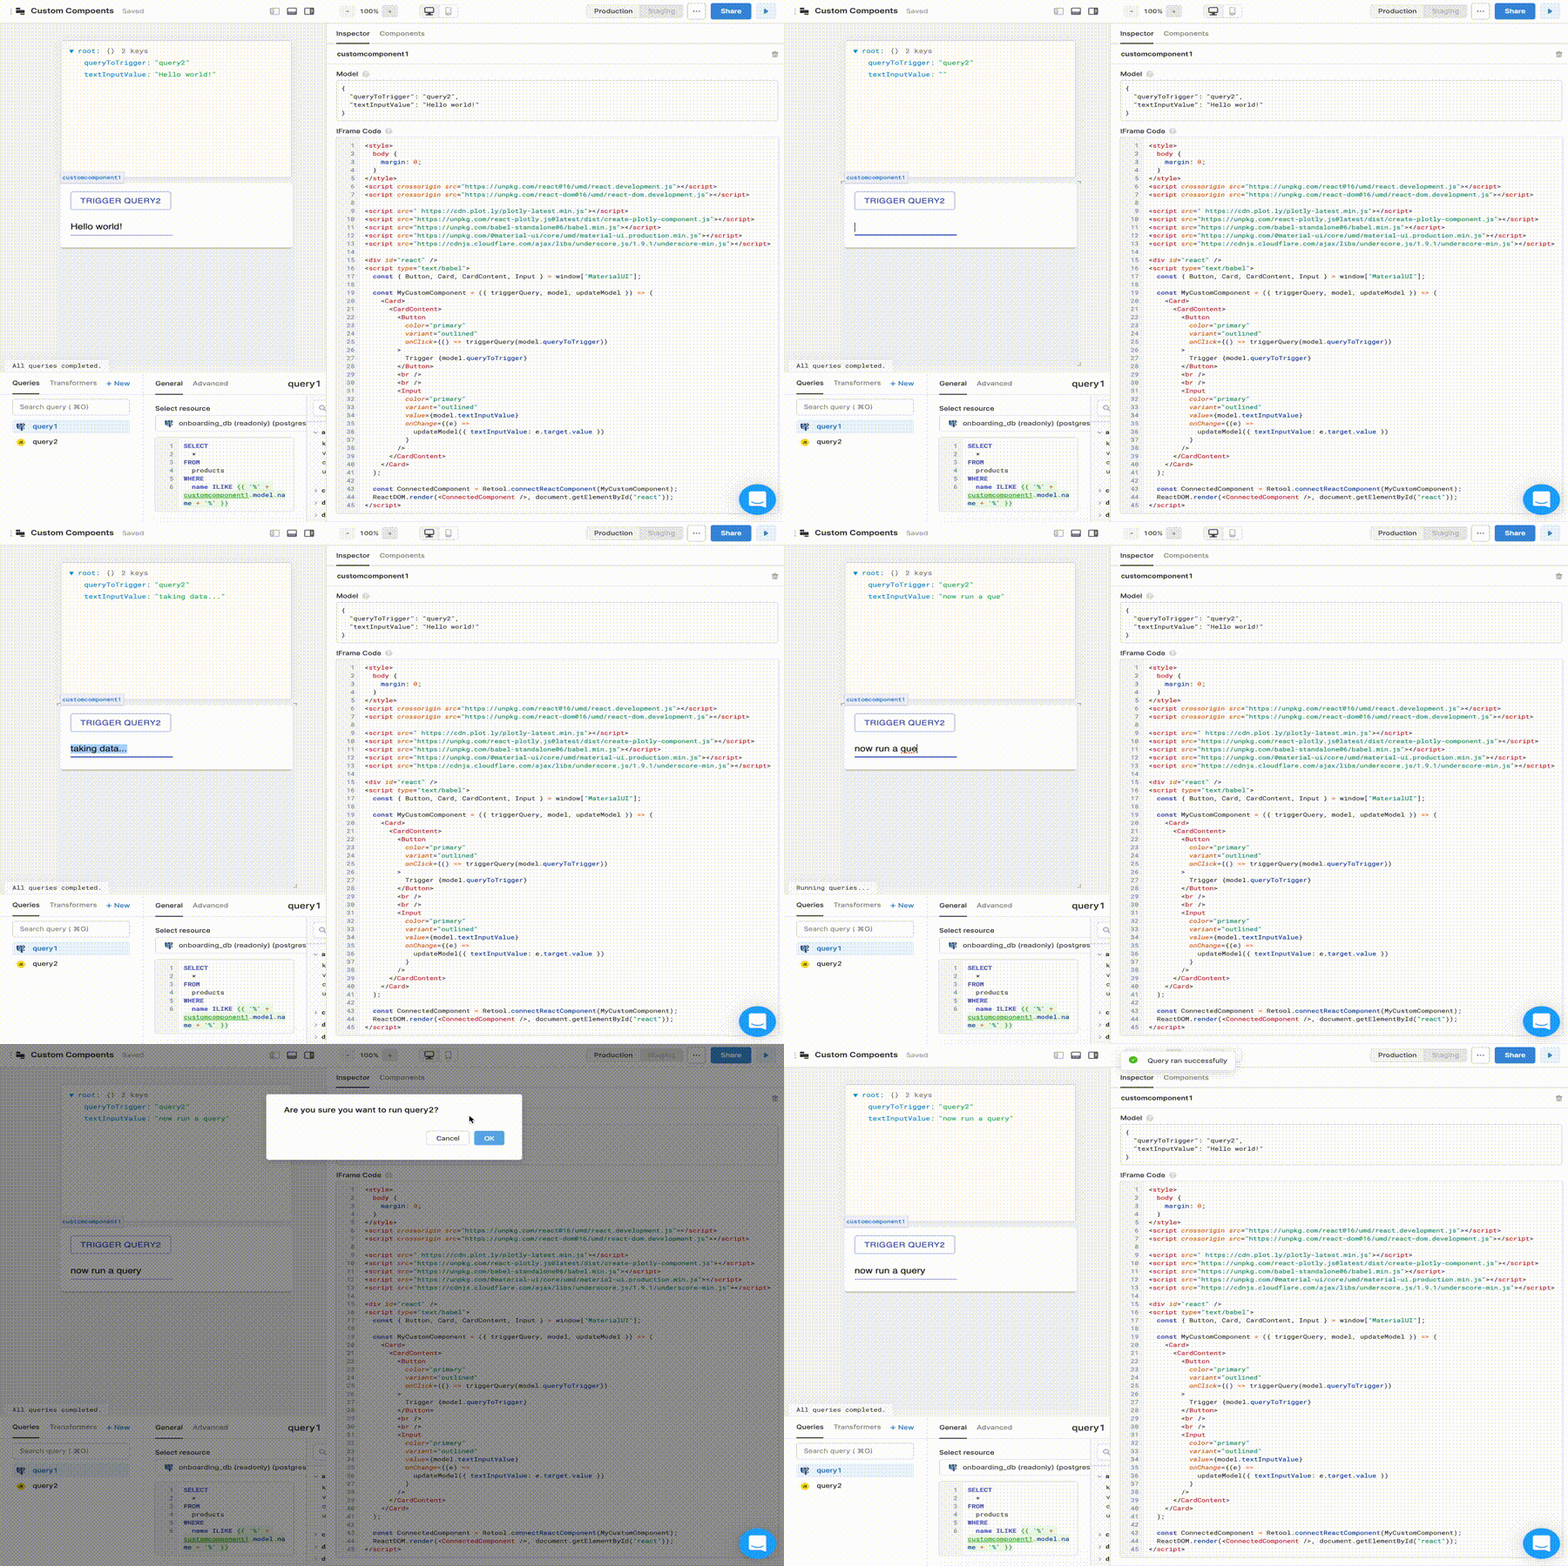
図8. マテリアルデザインのボタンと入力を例にしたカスタム・コンポーネント
カスタム・コンポーネント用のモデルを設定します。
{
  "queryToTrigger": "query1",
  "textInputValue": "Hello world!"
}
Iframe Codeフィールドに、カスタム・コンポーネントを実装するための以下のコードを記述します。
<style>
  body {
    margin: 0;
  }
</style>
<script src="https://cdn.tryretool.com/js/react.production.min.js" crossorigin></script>
<script src="https://cdn.tryretool.com/js/react-dom.production.min.js" crossorigin></script>
<script src="https://unpkg.com/@material-ui/core/umd/material-ui.production.min.js"></script>

<div id="react"></div>

<script type="text/babel">
  const { Button, Card, CardContent, Input } = window["material-ui"];

  const MyCustomComponent = ({ triggerQuery, model, modelUpdate }) => (
    <Card>
      <CardContent>
        <Button
          color="primary"
          variant="outlined"
          onClick={() => triggerQuery(model.queryToTrigger)}
        >
          Trigger {model.queryToTrigger}
        </Button>
        <br />
        <br />
        <Input
          color="primary"
          variant="outlined"
          value={model.textInputValue}
          onChange={(e) =>
            modelUpdate({ textInputValue: e.target.value })
          }
        />
      </CardContent>
    </Card>
  );

  const ConnectedComponent = Retool.connectReactComponent(MyCustomComponent);
  ReactDOM.render(<ConnectedComponent />, document.getElementById("react"));
</script>
Reactを使用しないJavaScript
Reactを使用したコードではないPure JavaScriptを書いている場合、window.Retoolを使用して、モデルを更新したり、クエリーをトリガーしたり、モデルに挿入された新しい値をリッスンすることができます。
関連するメソッドは、modelUpdate、triggerQueryおよびsubscribeです。
<html>
  <body>
    <script>
      function updateName(e) {
        window.Retool.modelUpdate({ name: e.target.value });
      }
      function buttonClicked() {
        window.Retool.triggerQuery('query1')
      }
      window.Retool.subscribe(function(model) {
        // モデルの更新をサブスクライブする
        // すべてのモデルの値へはここからアクセスできます
        document.getElementById("mirror").innerHTML = model.name || '';
      })
    </script>
    <input onkeyup="updateName(event)" />
    <button onclick="buttonClicked()">Trigger Query</button>
    <div id="mirror"></div>
  </body>
</html>
Reactを使用しない複雑なJavaScriptの例
この例ではReactを使用していませんが、Chart.jsを読み込んで、積み上げ横棒グラフを表示しています。このモデルとIFrame Codeを自分のカスタム・コンポーネントに貼り付ければ、すぐそのまま使用できます。
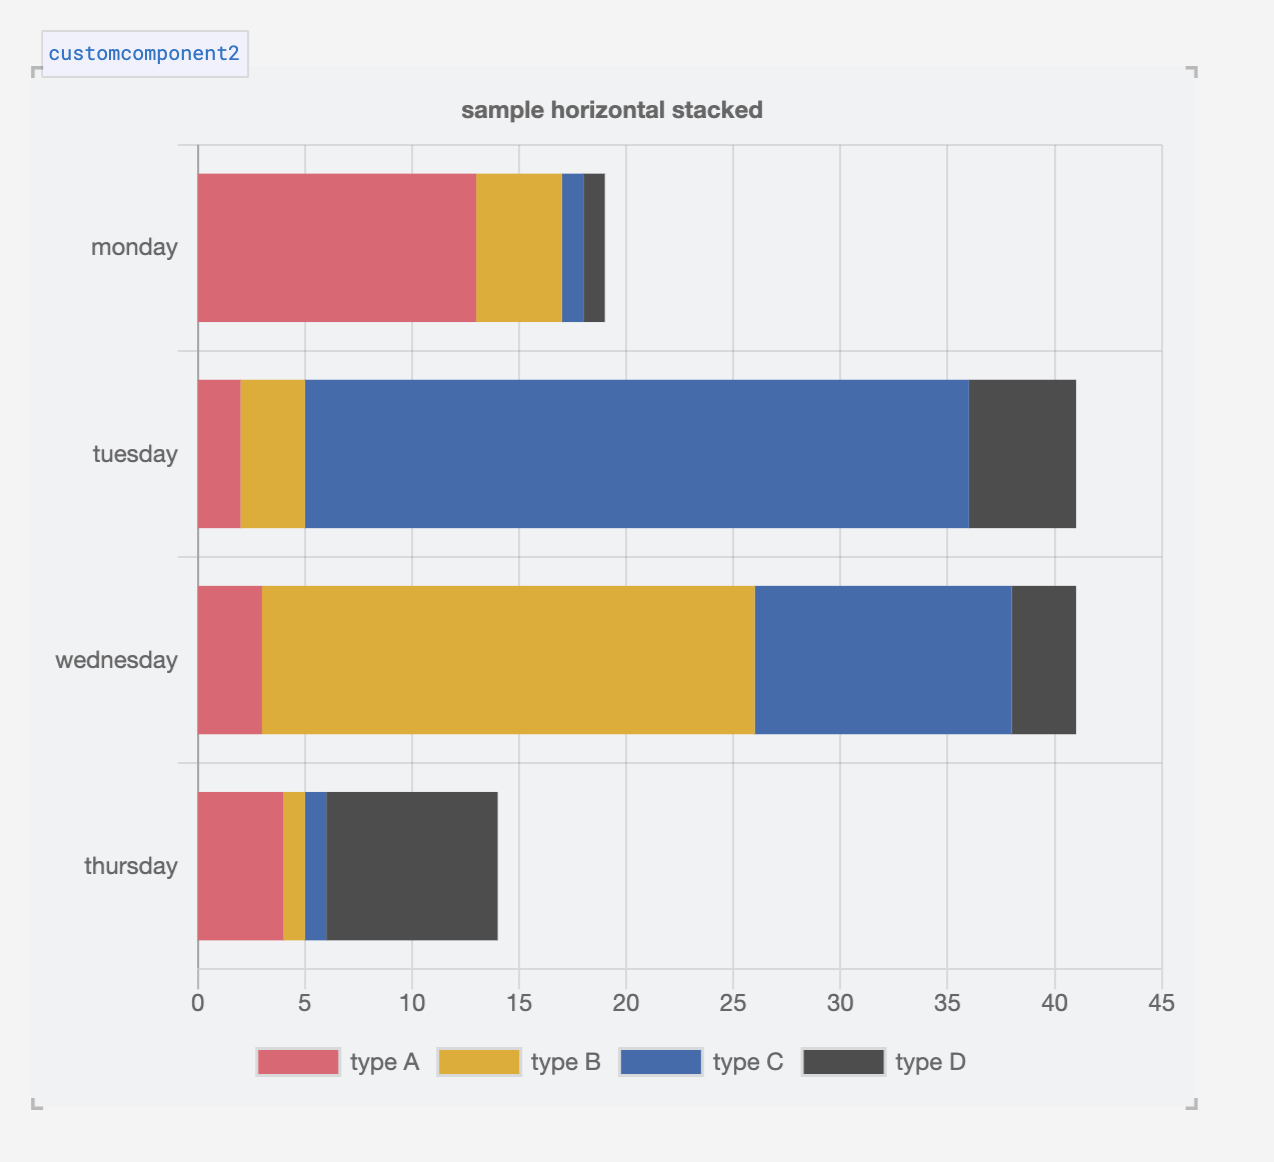
{ type: "horizontalBar",
  options: {
  responsive: true,
    stacked: true,
  maintainAspectRatio: false,
  title: {text: "sample horizontal stacked",display: true},
    tooltips: {mode: "index", intersect: true},
  legend: {position: "bottom"},
     scales: {
            xAxes: [{
                stacked: true
            }],
            yAxes: [{
                stacked: true
            }]

        }},
    data: {
    labels: {{['monday', 'tuesday', 'wednesday', 'thursday']}},
      datasets: [
    { label: "type A", data: {{[13,2,3,4]}}, backgroundColor: "rgb(231,95,112)"},
    { label: "type B", data: {{[4,3,23,1]}}, backgroundColor: "rgb(230,171,2)"},
    { label: "type C", data:{{[1,31,12,1]}},        backgroundColor: "rgb(56,108,176)"},
    { label:"type D", data:{{[1,5,3,8]}},        backgroundColor: "rgb(77,77,77)"}
    ] }
}<html>
<style>
body {
margin: 0;
}
</style>
<script src="https://www.chartjs.org/dist/2.8.0/Chart.min.js"></script>
<script src="https://www.chartjs.org/samples/latest/utils.js"></script>
<script>
window.Retool.subscribe(function(model) {
if (!model) { return }
model.options.tooltips['callbacks'] = {
footer: function(tooltipItems, data) {
var sum = 0;
tooltipItems.forEach(function(tooltipItem) {
sum += data.datasets[tooltipItem.datasetIndex].data[tooltipItem.index];
});
return sum;
}
};
var chartData = model.data;
var ctx = document.getElementById('canvas').getContext('2d');
if (!window.myMixedChart) {
window.myMixedChart = new Chart(ctx, model);
} else {
window.myMixedChart.data = model.data;
window.myMixedChart.options = model.options;
window.myMixedChart.update();
}
})
</script>
<div class="chart-container" style="position: relative;margin: auto; height:100vh; width:100vw;">
<canvas id="canvas"></canvas>
</div>
</body>
</html>Updated 4 months ago
